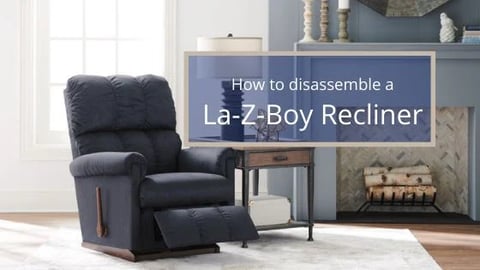
How to Disassemble a La-Z-Boy Recliner in 3 Easy Steps
May 30, 2025

Est. Reading Time: 7 Mins
For decades, La-Z-Boy recliner chairs have provided comfort and quality to households across Ottawa, Gatineau and Kingston. Given the need for occasional maintenance, transport, or rearranging, our clients frequently ask, “How do I disassemble my La-Z-Boy recliner chair without damaging it?”
With the help of La-Z-Boy’s removable and locking back, manual recliner disassembly and reassembling your recliner is straightforward and only require a flathead screwdriver.
Follow this step-by-step guide to safely disassemble and reassemble your La-Z-Boy reclining furniture.
Key Takeaways:
- Simple Tool Requirements: Disassembling and reassembling only requires a flathead screwdriver, making this process accessible with minimal tools needed.
- Power Recliners Tip: For La-Z-Boy power recliners, take special care to disconnect all electrical cables before starting to prevent damage and ensure a smooth process.
- Maintenance Opportunities: While disassembled, use the chance to tighten loose screws, which will help prevent wobbling and maintain your home recliner’s long-term stability.
- Safety First: Always verify that the brackets are fully locked when reassembling, ensuring the recliner is secure and safe for future use.
In This Article…
Tools You Need
The only tool needed to take apart a recliner for moving is a flathead screwdriver. This tool is used to release the backrest from the locking levers on each side of the chair, and then re-secure it after you’re done.
Expert Tip: "A slotted or flathead screwdriver works best for this job, as it allows you to easily lift the locking levers without damaging the upholstery or frame," says Jason Nernburg, our La-Z-Boy delivery supervisor in Ottawa.
If you're wondering, “What tools do I need to fix a La-Z-Boy power recliner that won't recline?”, the answer may go beyond the flathead screwdriver. The best way to figure out what you need exactly is by consulting with your local La-Z-Boy technician for diagnostics and parts.
Step 1: Preparing Your Recliner for Disassembly
Preparing the recliner properly is essential to ensure safe and effective disassembly. Before you begin, follow these preparatory steps:
1. Position the Recliner
Carefully push your recliner forward so that the backrest is accessible and the arms are touching the floor. This angled position will give you easy access to the locking levers at the base of the backrest.
2. Clear Your Workspace
Make sure you have enough space around the recliner. This will allow you to move the recliner as needed and keep it steady while working on the locking mechanisms.
Power Recliner Note: If you’re working with a power recliner, there may be electrical connections to disconnect. Avoid any accidental strain on the wires by tilting the recliner carefully. Ensure the power is off before starting.
Safety Tip: “Angling the recliner forward not only gives you access to the back but also keeps it balanced while you’re working. It’s important to avoid any unexpected recline motion during disassembly,” says Jason.
Step 2: Removing the Back of Your Recliner
Now that the recliner is in position, here’s how to remove the back of the recliner effectively:
1. Locate the Locking Levers
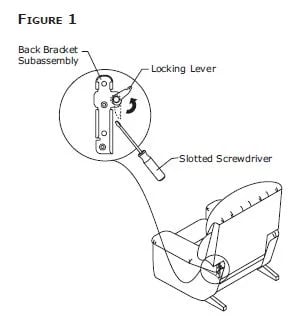
On each side of the recliner, near the base where the backrest meets the body, you’ll find the locking levers. These are what keep the back securely attached to the main frame.

Slide your flathead screwdriver into the space between the outside back and the arm, aligning it with the lever.
3. Unlock the Brackets
Gently pry the levers up using the screwdriver until you hear a click or feel the lever release. This unlocks the brackets holding the backrest in place.
4. Lift the Backrest
Stand behind the recliner and pull the backrest up and away from the chair. A gentle rocking motion can help if the backrest feels tight. Continue lifting until the backrest detaches fully.
Power Recliner Caution: If your recliner has massage, heat, or other power features, carefully disconnect any attached wires before lifting the backrest off. This will prevent strain on the connectors and avoid accidental disconnections.
5. Tighten Loose Brackets
While the backrest is removed, take this opportunity to tighten the screws on the brackets. Over time, these screws can loosen, causing the backrest to wobble. Tightening them now ensures stability when reassembled.
Expert Insight: "Taking a moment to tighten all accessible screws while the back is off will keep your recliner sturdy and wobble-free," advises Jason.
Note: Avoid using the recliner without the back properly reattached and locked in place. This ensures both safety and structural integrity.
Step 3: Reinstalling the Back
Reattaching the backrest securely is crucial for safe use. Follow these steps to reinstall the back and make sure it’s stable:
1. Position the Backrest
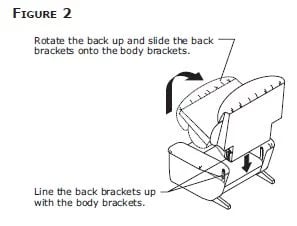
Hold the backrest at a slight angle and align the metal brackets on the back with the body’s brackets. Check that the sides are correctly positioned to prevent misalignment.
2. Slide the Backrest Down
Gently push the backrest down onto the frame, ensuring both brackets engage securely. The backrest should slide smoothly without forcing it.
3. Lock the Brackets
Use the flathead screwdriver to press the locking levers back down until they click into place. This locks the backrest onto the recliner, securing it for use.
4. Test Stability
Once locked, carefully twist and rock the backrest to confirm it’s securely attached. If the backrest shifts or feels loose, double-check that both levers are fully engaged.
Expert Tip: “After reinstallation, test the backrest’s stability with gentle movements. If it wiggles, the brackets may need further adjustment,” suggests Jason.
Power Recliner Check: For power recliners, reconnect all wires and test the power functions before use to ensure full operational safety.
FAQs
Can I follow the same steps for a power recliner?
Yes, the steps are similar for both manual and La-Z-Boy power recliners. However, be cautious of any power connections and disconnect them carefully before removing the backrest to avoid damage. To learn more about our Power Reclining Furniture at La-Z-Boy Ottawa, Gatineau and Kingston, take a look at this article.
What should I do if my recliner back continues to wobble after tightening?
If you’ve tightened the screws and the wobbling persists, the locking levers or brackets may require further adjustments. Contact our La-Z-Boy service department in Ottawa, Gatineau or Kingston for additional assistance.
What should I do if I can’t remove the backrest after unlocking the levers?
If the backrest doesn’t detach after unlocking the levers, try gently rocking the recliner back and forth while pulling upward. This motion helps release any resistance caused by the brackets. If it remains stuck, double-check that both locking levers are fully unlocked.
Can I get in-home service for recliner repairs from La-Z-Boy Kingston?
Yes! La-Z-Boy Kingston offers in-home service for many recliner issues. Contact our service department to schedule an appointment or learn about what’s covered under your warranty.

What's Next?
Now that you know how to take apart and reassemble your recliner, you are free to move it wherever you want safely and with ease. With over 90 years of experience in furniture, there’s a reason La-Z-Boy has the number one-selling recliner brand in North America.
We are here to help answer your recliner maintenance and moving questions. You can visit one of our Ottawa, Gatineau Kingston locations or schedule an online or in-person appointment today. If you’re interested in seeing more about our recliners today, take a look at our Comprehensive Recliner Buyer’s Guide from La-Z-Boy Ottawa, Gatineau & Kingston.
(1).jpg?width=150&height=150&name=9C8A3062-Enhanced-NR%20(1)(1).jpg)
Nicholas Carchidi
Content Writer at StyleMeetsComfort.ca
Nick has been the lead content writer for La-Z-Boy Ottawa, Gatineau and Kingston since 2022, specializing in the furniture industry. He collaborates with experts in his field, ensuring that each piece on the La-Z-Boy Learning Centre is accurate and valuable. He provides readers with expert knowledge on all things furniture. If you'd like to learn more about Nick, you can check out his LinkedIn page here.
Product Info Request
Please provide us with your name and email and we'll get back to you as soon as possible regarding this item.

